Create a new tenant
Important: To create a new tenant, you need to have access to the master console of Access Manager. Ensure that you have the master admin credentials. For details, see Get the master admin password for Access Manager.
For each new tenant that you add, the corresponding tenant admins need to configure all the settings separately in tenant’s Access Manager. However, the platform’s configuration settings in Configuration Manager are the same for all the tenants.
Add a new tenant
With the master admin credentials, log in to the Access Manager master console:
https://localhost/auth/admin/master/console/, where “localhost” is the name or IP address that was configured for the Platform.
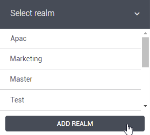
In the Select realm dropdown list, click Add realm.
In the Add realm pane that appears, enter the tenant name, and then click Create.
The newly created tenant has an administrator user who can configure the tenant.
The default admin credentials are admin/admin. Change the password for the admin user, or completely delete the user if you plan to replace it with another administrator username.
For details, see Manage user details.
Access a new tenant
To access a new tenant, log in to Platform with the tenant’s admin credentials:
If the environment is configured to use an IP address, add the “tenant” query string parameter to it:
http(s)://<server>/home?tenant=<tenant_name>
For example, https://10.15.16.221/home?tenant=tenant1, where “tenant1” is the name of the newly created tenant.
Then, click the Access Manager tile on the Platform Home page.
If the environment is configured to use a domain name, use the following URL:
http(s)://<tenant_name>.<domain>/home
Then, click the Access Manager tile on the Platform Home page.
For example, https://tenant1.company.com/home, where “tenant1” is the name of the newly created tenant.
Configure a tenant
For a new tenant, configure the following settings as needed:
In Access Manager, go to the Licenses page.
Click Upload license script, enter the script for this tenant, and then activate the license.
For details, see Manage licensing.Define tenant’s (realm) general settings as needed (email, login, look & feel, and others).
For details, see Realm settings.Add or import users for the tenant.
For details, see Authentication methods.Configure identity providers, choose whether to use SSO, and define other authentication settings.
For details, see Single sign-on.Create groups and assign users to groups.
For details, see Groups, Manage groups, and Manage user details.Assign the available roles to groups and users.
For details, see Permissions in default roles and Manage groups, and Manage user details.


Comments
0 comments