Add storyboard subscription
With a storyboard subscription, the subscribers receive emails with the storyboard snapshots, on a scheduled basis. This way, they can review the latest storyboard updates without having to log in to the platform.
Prerequisites
You have all the necessary role permissions granted by an administrator in Access Manager.
 Permissions
storyboards.access
You have a storyboard to share in the Storyboards pane.
For the content in Shared with me, you need to have the View and Edit shared content permissions granted by the sharer.
The email SMTP server is configured by your administrator in Access Manager. To receive subscription emails, users must have valid email addresses defined.
Procedure
On the application sidebar, click
 Storyboards.
The Storyboards pane appears. For details, see Storyboards pane.
For the storyboard (tile or row), point to
 More actions, and then select Subscribe > Add subscription.
Alternatively, you can open the storyboard, click
 Storyboard options on the Storyboards toolbar, and then select Subscribe > Add subscription on the menu.
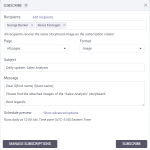
The Subscribe dialog appears.
In the Recipients field, your user is added by default.
To add other subscribers, click the Add recipients link. In the Recipients dialog, specify who should receive the storyboard:
Groups – Click Groups, and then click the appropriate groups in the list.
Users – Click Users, and then click the appropriate users in the list.
The selected groups and users appear in the recipients list.
To remove a recipient from the recipients list, click
 next to the corresponding name.
In the Page dropdown list, select what you want to publish:
- All pages – To publish all the pages of this storyboard.
- Select a specific page name from the list.
In the Format dropdown list, leave the image format selected.
To clarify subscription emails, fill in the Subject and Message fields as needed.
The following macros are available: ${first.name}, ${last.name}, ${email}.
The default schedule is shown at the bottom.
To change the schedule, click Show advanced options, and select the frequency of the subscription email:
- Minutes – Run every 15 or 30 minutes on a specific day(s) of the week.
Hourly – Run every hour on a specific day(s) of the week.
Daily – Run once a day at the specified hour (including time zone).
Weekly – Run on a specific day(s) of the week at the specified hour (including time zone).
Monthly – Run on a specific day(s) of the month at the specified hour (including time zone). For days, you can select Last to always have the last day of the month. The selected days are highlighted. To deselect a day, click it again.
Click Subscribe.
The subscription is created, and the email with the corresponding images to be sent according to the schedule.
To review your subscription, for the storyboard (tile or row), point to
 More actions, and select Subscribe > Manage subscriptions. For details, see Manage storyboard subscriptions.

Comments
0 comments